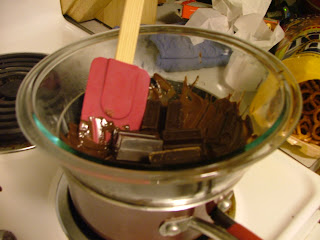
The chocolate-covered pretzels were by far the easiest to make. I used store-bought mini pretzels and a few chunks of semisweet baking chocolate, and voila... chocolate-covered pretzels. I created a double-boiler using a small saucepan and a medium glass bowl, being careful to leave plenty of room between water and my bowl. The chocolate easily melted over medium-high heat, and then I simply dropped my pretzels in, one or a two at a time, to coat. Once coated, I let them dry for a few hours on wire racks (set over paper towels to catch the chocolate drips). I completely covered about half of the pretzels I made, and simply dipped the rest, leaving about half of the pretzel plain. These make a nice, salty-sweet snack and are a great way to cure a chocolate craving.
Next came the raspberry thumbprint cookies. I used this recipe from foodnetwork.com, but I'll share it for you too.
Ingredients:
1 3/4 cups all-purpose flour
1/2 teaspoon baking powder
1/2 teaspoon fine salt
3/4 cup unsalted butter (1 1/2 sticks), softened
2/3 cup sugar, plus more for rolling
1 large egg
1/2 vanilla bean, seeds scraped from pod, or 1/8 teaspoon vanilla bean paste or 1 teaspoon pure vanilla extract
1/3 cup raspberry jam or preserves. cherry or strawberry would also make great choices.
1. Preheat oven to 350 degrees F. Grease 2 baking sheets or line with parchment paper or silicone mats.
2. Whisk the flour, baking powder and salt together in a bowl. Set aside.
3. In another bowl, whip the butter and the sugar with a hand-held mixer until fluffy, about 5 minutes. Beat in the egg and vanilla until just combined. Slowly beat in the dry ingredients in 2 additions, mixing just until incorporated.
4. Scoop the dough into 1-inch balls with a cookie or ice cream scoop and roll in sugar. (Or you can do like I did and simply scoop the dough up with a teaspoon and roll in your hands, and then roll in sugar.) Place about 2-inches apart on the prepared baking sheets. Press a thumbprint into the center of each ball, about 1/2-inch deep. Fill each indentation with about 3/4 teaspoon jam.
5. Bake cookies until the edges are golden, about 15 minutes. (For even color, rotate the pans from top to bottom about halfway through baking.) Cool cookies on the baking sheets.
The butter cookie base is light, creamy, and moist... the perfect compliment to the heavy, sweet-tartness of the raspberry preserves. Plus they still look festive with the little spot of red-purple sparkling in the center... without the headache of frosting. :)
And of course I saved my favorite for last! I took my recipe for coconut macaroons from my trusty Better Homes and Gardens cookbook.
Ingredients:
2 2/3 cups flaked sweetened coconut (7 ounces)
2/3 cup of sugar
1/3 cup all-purpose flour
1/4 teaspoon salt
3 egg whites
1/2 teaspoon vanilla extract or 1/4 teaspoon almond extract (I used vanilla)
4 ounces semisweet chocolate (optional)
1 teaspoon shortening (optional)
Directions:
1. Preheat oven to 325 degrees F. Lightly grease and flour (I actually sugar, to keep the cookies from getting tough) a large cookie sheet or line with parchment paper.
2. In a medium mixing bowl combine coconut, sugar, flour, and salt. Stir in egg whites and vanilla. This is best done with a spatula, not a mixer.
3. Drop mixture by rounded teaspoons 2 inches apart onto the prepared cookie sheet. Bake for 20-25 minutes or until edges are lightly browned. Transfer to a wire rack and let cool.
4. If desired, melt chocolate with shortening over medium-high heat in a double boiler. Dip the cookies in the chocolate or drizzle lightly over the top. Adding shortening to the chocolate may seem a little weird, but it does help to create a better consistency for drizzling. If planning to dip the cookies, the shortening could easily be omitted.
Crunchy on the outside, buttery on the inside, with the warm, sweet flavor of the coconut... these cookies are hardly resistible. And with their small size, it's easy to justify eating more than one or two. :)
For presentation, I placed a few of each cookie and several pretzels in separate baking cups, and then stacked the cups on top of each other in a small gift bag. I tied the bag with red or green ribbon, and tied on a handmade card with a heartfelt thank-you message and description of the treats on the inside.
I left each package in the office of each professor, and got several thank-you emails later in the day. :)
I hope they enjoyed eating these goodies as much as I enjoyed making them! And, most of all, I hope they understand how grateful I am for all the hard work they do for each of us everyday.


No comments:
Post a Comment