
In the spirit of challenge and personal growth, I have set a goal for myself: a different kind of bread from my Dough cookbook every month for the next year. It's a fairly attainable goal - even with as busy as I am these days, it's easy enough to block out one afternoon a month to devote to the art of breadmaking. I bought this cookbook with the intention of putting it to good use, so why not make a project out of it? Plus, I'm one of those people who needs plans and deadlines, otherwise tasks as time-consuming as this one can easily get lost in the sea of ideas I have and fall prey to procrastination. So that's the plan! One bread recipe a month for a year.
This month's bread is one that looks way more complicated than it is: the fougasse. The author, Richard, says that he likes to use this as a beginner's recipe for the students in his breadmaking classes, because it's so simple and the results are impressive. It's a simple white bread recipe, cut into four or six pieces and then strategically cut to look like a leaf. That's it!
However, as I mentioned in my original post about this book, the French method of working the dough is a different and interesting process. So, to briefly illustrate, I employed the help of my hubby-to-be to take pictures of me working the dough, so you can kind of see what I'm talking about. We were having issues getting the camera to focus well with the poor lighting in the kitchen, so bear with me, but I think you'll still get the idea. So, without further ado, let's make some bread!
What You'll Need:
1/3 ounce fresh yeast (as Richard prefers) or 1 1/2 teaspoons dry active yeast
18 ounces white bread flour
2 teaspoons fine-grain salt
12 1/2 ounces water
cornmeal or flour for dusting
1 large mixing bowl
a plastic scraper
a clean work surface
a baking stone (preferably) or a baking sheet
As you can see, Richard really prefers to weigh most of his ingredients. He claims this is the most accurate way to do things, and since he's kind of an expert and breadmaking is a bit of a science, I will not argue. :)

First, rub the yeast into the flour using your fingertips. That's right - no proofing the yeast here. Just rub it right into the flour. Next add the salt and the water. Then hold the bowl with one hand and mix, using your scraper, with the other. After about 2 or 3 minutes of mixing, the dough will start to come together. Once it begins to form a sticky blob, turn the dough out onto your counter, and remember... no flour! Even though the dough looks like a giant sticky mess right now and it seems like there's no possible way in this world it will turn into bread dough without adding copious amounts of flour, trust me. It will eventually become the smooth, elastic ball you're expecting.

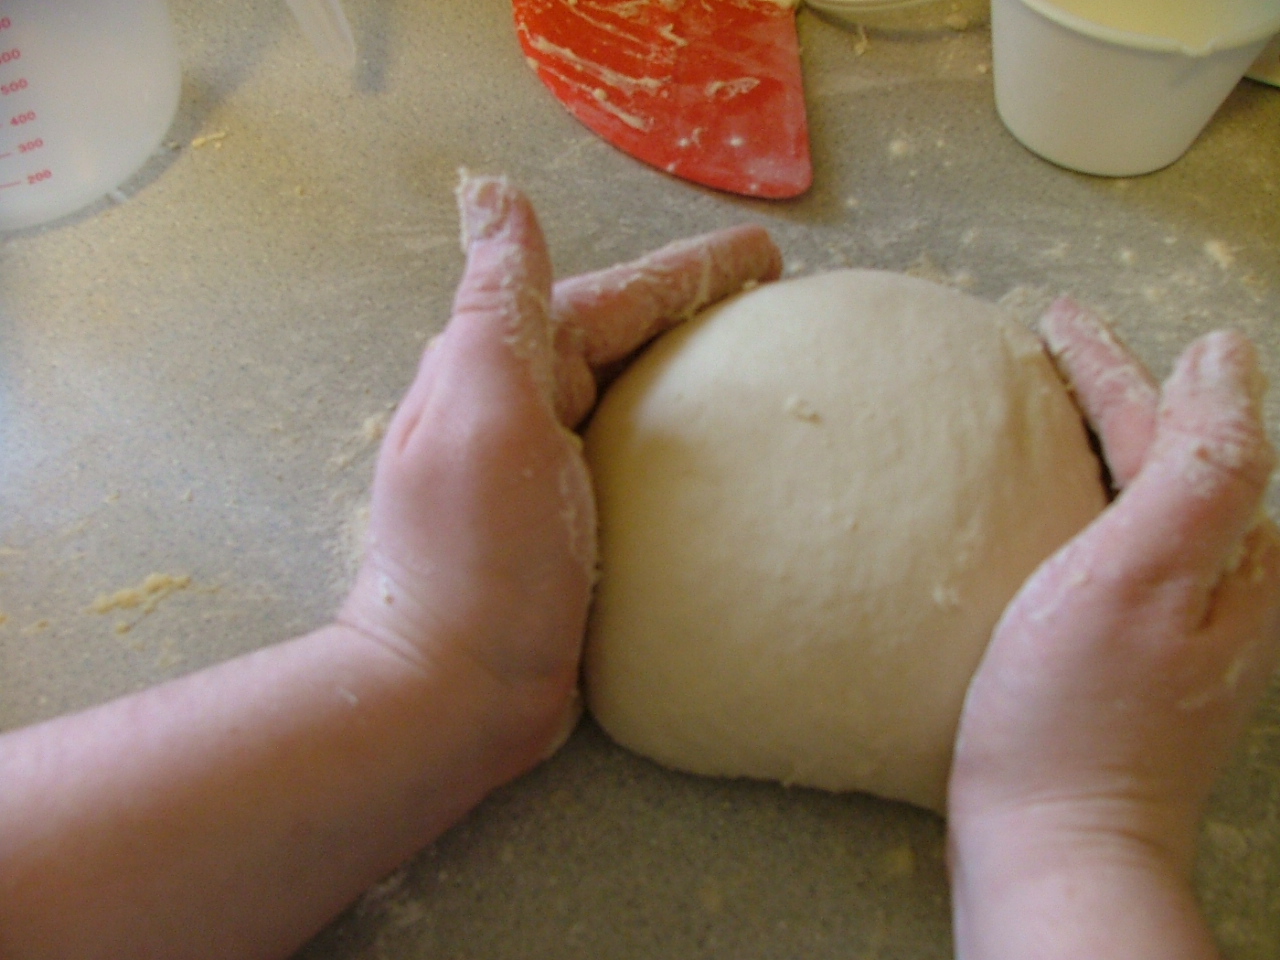
So here it is... this giant sticky ball of flour and water. Now what do you do with it? Well, start by sliding your fingers underneath it like a pair of forks. Then lift the dough and slap it on the counter away from you. It will be tough at first, since the dough is so sticky, but trust me, it will get easier as the dough gets closer to its end consistency.

After you've slapped the dough on the counter, gently stretch it toward you...

...then fold the dough over itself. This folding creates pockets of air that will expand as the dough rises and then bakes, creating a nice, chewy center. Then pick it up again, slap it against the counter, stretch, and fold it over again. Do this over and over again until it forms a smooth, elastic ball. It may take a while (up to 10 minutes for me!) the first time or two that you do this, but eventually your technique will improve and it'll go faster.

Once the dough has become smooth, gently mold it into a roughly rectangular shape and fold the four corners on top of each other into the center, to create just a few more air pockets. Then gently roll it over so the seam side is on the counter, and you should have a nice pretty ball that looks like this!
Lightly flour the inside of your mixing bowl and place the ball into it. Cover it lightly with a lint-free dish towel, place it in a warm, draft-free place, and let it rise until it has roughly doubled in size. This should take about an hour, but don't panic if it takes a little longer or happens a little faster, as this largely depends on the temperature of the environment. From here, you can make several different styles of bread, all based on this simple white-bread beginning! The directions from here are all specific to the fougasse.

Now, preheat your oven to 475 F. If using a baking stone, lightly oil it and dust with cornmeal (if using), and place it in the oven so that it can heat at the same time as the oven.
Once the dough has risen, generously dust your counter with flour or cornmeal. Using your scraper, carefully transfer the dough to the counter. Be careful not to deflate the dough! Allow it to spread as it sits on the counter. Generously dust the top of the dough with flour or cornmeal, cover again with your dishtowel, and allow it to rest for another 5 minutes.

Using the flat edge of your scraper, cut the dough into two rectangles, then cut each piece again into two or three roughly rectangular pieces. Try to handle the dough as gently as you can to keep it light and airy. Keep the pieces well-dusted.

Next, use the flat end of your scraper to make a large diagonal cut down the center of one of your pieces of dough. Make sure to cut all the way through the dough until you see your counter, but be careful not to go through the edges of the dough. Then make other diagonal cuts fanning out on each side of the center one. Gently open the slits to form holes. Be bold - if these slits are too close together they'll simply close back up as they bake.

Then, carefully transfer the fougasses to the hot baking stone. Do this as quickly as possible, to avoid losing heat inside the oven. Using a spray water bottle, lightly mist the inside of the oven with water just before closing the door. Turn the heat down to 450 F, and bake for 10-12 minutes or until golden brown.

Serve immediately! Crusty bread is always better warm, after all. These were fantastic with the simple Italian vegetable soup I made on Saturday... crunchy on the outside, soft on the inside, and super-absorbent for soaking up the salty broth. Plus they made a pretty centerpiece for the table!
Well, I hope you guys have found this tutorial helpful! I look forward to many more bread recipes in the months to come, and to sharing the fun with you! On the menu for April: coarse salt and rosemary focaccia.
These are very cool :)
ReplyDelete